1

Communicating your sustainability efforts: A guide for accommodation businesses

Companies make great efforts to be more sustainable, but fail to communicate it convincingly to their customers in a way that it clearly shows how their experience will be superior. This is a missed opportunity to increase revenue, reduce seasonality, retain loyal customers and increase customer satisfaction. Taking seriously how you communicate sustainability will improve your overall efficiency, motivate staff and allow you to achieve more in less time.

Read more from Travel Foundation’s guide: Communicating your sustainability efforts


Greener excursions: Building relationships

Building relationships with the stakeholders related to your new excursion product is an important and ongoing process. It can take some time, but will help you create a unique product.

Read on to find out more about stakeholder engagement from the Travel Foundation’s guide: Greener Excursions: Building relationships


Considerations for greener excursions to historical & natural attractions

Many attractions, historical and otherwise aren’t always easy to market to customers, especially if they’re not overtly interesting visually. They need to be brought alive in some way, so what can you do differently to enthuse them?

Read more from the Travel Foundation’s guide: Considerations for Greener Excursions to Historical and Natural Attractions


Hallmarks of a quality visitor experience

The livelihood of any business in the tourism industry relies on visitors but not all visitors enjoy their experience. A good visitor experience can further spur positive word-of-mouth marketing, favourable reviews and, in turn, more feet through the door for that particular business.

Here are 5 ways to ensure that your visitors have a quality experience:

1. Be friendly
It goes without saying that travellers want to visit places that are well looked after and where they are greeted with a friendly smile. People who are visiting are outside of their home towns – and sometimes their own country – so be sure to be hospitable and look after them in order to make their stay a memorable one.
Make sure that your reception staff are friendly and welcoming at all times. This is the first impression visitors have of your businesses and this can make or break the experience. Encourage and motivate all of you staff to be friendly and greet visitors. From the gardener to the general manager needs to play their part.

2. Provide quality information
Providing visitors with detailed information is essential. Many people have concerns or can become anxious around what will be provided, what is available, or where they need to go when they are away from home. While one establishment or attraction will not need to give as much information as others, answering the most frequently asked questions (FAQ) is a must for all business owners and can be done by means of a brochure, pamphlet or even visitor information signage around the establishment.

Also make sure that you have information available on other attractions or experiences in the area. Visitors appreciate a little local advice, so tell them about the special little restaurant where only locals go, or the craft market where they can get special deals. Make them feel like you are giving them additional information that others may not know of.

Always offer to check on the details. If they are unsure of an address or a number, or when the gate to the local reserve opens, offer to phone and check for them. Make them feel comfortable and secure at all times.

3. Ask for feedback
Nothing shows your visitors that you care about their experience like asking them to rate you. Many businesses ask their visitors to rate them before they leave, while others will send an email a day or two later providing a link to their TripAdvisor profile and asking for a review. This not only allows travellers to speak their mind after their experience and without fear of being questioned about their review, but it also allows businesses to gather critical information in order to identify any weaknesses and work on improving them.
The more you know about how visitors experience your businesses, the easier it is to improve on the quality of the experience.

4. Involve your community and buy locally
People travel to experience that which is different to where they live. Therefore, it makes sense to offer visitors things that they won’t get or experience anywhere else. If the local supermarket, deli or bakery makes something unique or special to the area, make sure to use it in your dishes, or have it on the table. Tell your visitors about these special products. They love to hear that products are sourced locally.

Make sure to know and involve your community in the experience. Can you offer them a tour in the local township, or show them where craft is produced locally? These elements are interesting to visitors and will not only have benefits to locals, but increase the chances of them recommending your establishment to friends.

MOST IMPORTANTLY – BE YOURSELF!


6 Key Elements to Attraction Sustainability

Africa is full of world-renowned tourist attractions, from the Kruger National Park and Victoria Falls to the iconic Table Mountain and the Namib Desert. Our attractions bring hundreds of thousands of travellers from across the globe each year flocking to see them, helping to keep the tourism industry alive and thriving.
It goes without saying that looking after these attractions is a priority if we want to continue to see tourism grow in Africa, creating more jobs and other opportunities. Here are the five key elements to sustaining a tourist attraction.

1. Attractiveness
It’s a no-brainer that if an attraction site is clean, free of litter and is well-maintained, people will want to visit it and enjoy it. Maintaining an attraction could involve simple tasks, such as clearing a pathway from overgrown shrubbery, to making sure windows are clean and public bins are emptied on a regular basis. A well-looked after attraction will appeal to travellers, bringing a steady flow of income and even opportunities for development.

2. Access
There’s no use in having a beautiful attraction if no one can get to it. Road signs in nearby towns directing travellers are always a good idea, as well as having good roads into the attraction site that well-looked after. Local and provincial government should be able to realise the income potential of an attraction, ensuring ease of access for interested travellers.

If access is a problem, make sure that this is clearly communicated upfront. Managing visitor expectations is critical, so if the road is bad and it takes two hours to reach you, be honest. Visitors hate to be misled by false or inaccurate information.

3. Infrastructure
Most attractions, regardless of whether they are natural, cultural or for amusement, require some form of infrastructure. This is all the basic equipment it needs in order to run, including electricity and water access as well roads, buildings and employees.

Maintaining infrastructure is one of the most important things to invest in in. If you don’t set aside funds for this every year, your attraction will soon deteriorate to the point where visitors won’t use it anymore.

4. Enterprise
Make use of opportunities around the attraction to generate income and create jobs within the community. There are usually a number of ways for people to benefit from an attraction, from selling soft drinks, to craft or even guiding. Maximise the opportunities at your site and encourage the community to participate in a meaningful way.

Always make sure that visitors are not harassed by hawkers or guides. Be helpful and friendly, but never be overbearing or pushy. Visitors like their space and will ask questions if they want to know more.

5. Provide quality information
Make sure that the attraction is interpreted to visitors. This could mean a well-trained guide take them around the site, or that you have signboards with information. An attraction is only really appreciated if it is understood, so make sure that you have lots of information available.

Providing visitors with detailed information is essential. Many people have concerns or can become anxious around what will be provided, what is available, or where they need to go when they are away from home. While one attraction may not need to give as much information as others, answering the most frequently asked questions (FAQ) is a must for all business owners and can be done by means of a brochure, pamphlet or even visitor information signage around the attraction.

Be clear about when guided tours take place or what the operating hours are. Make sure that you stick to this as visitors often plan their days in advance and are left disappointed and angry if they arrive to find a closed gate.

6. Awareness
The final element of sustaining a good tourist attraction is making sure that all relevant information about the attraction is up to date and easily available for interested travellers to find. Having brochures, posters, information at local tourism offices and signage are all great ways of helping to spread awareness about the attraction. Partnering with local and national tourism bodies can be very helpful in marketing your attraction as well. Make sure you have a strong presence online by listing your attraction on websites and make sure your attraction has a page/account on at least one social media platform, such as Facebook, where you can post updates, news, photos and visitor testimonials.


How to Host a Travel Writer

Press trips and media coverage are a big part marketing. Traditional advertising is no longer trusted by consumers, so paying bloggers or journalists to write about your route and promote it via social media can be valuable.

It is always important to research a journalist or blogger to ensure they are a good fit for the type of exposure you’re looking for and that you can afford them. Partnering with local tourism offices or municipalities can also help to increase your budget if you’re strapped for cash.

Here are some tips for hosting a blogger or journalist along your route:

Pitch the trip to them
When you’re pitching a trip to a freelance journalist or blogger, make it sound as enticing and interesting as possible. Try to keep to a specific theme – such as culture, food or wine – that will interest them. Suggest an itinerary that will provide story-telling experiences as this will make their job easier and more enjoyable. Providing the social media handles (Handles are another name for social media names on Twitter and Instagram and are used to mention or ‘tag’ the business. E.g. @open_africa on Instagram or @OpenAfricaOrg on Twitter) for the businesses along the itinerary is also useful so that the journalist/blogger can begin promoting them on social media before they even get there.

Create a Hashtag
Creating a hashtag for the trip to use on social media is another great way to show you’ve thought this through. A hashtag makes it easy for posts (photos, tweets and others) to be indexed together so that if anyone is searching for more information on the trip, they can search using the hashtag Hashtags should be kept short but descriptive as possible. For example, Reunion Tourism has a hashtag they use which tells travellers how they can reference it: #GoToReunion

See how easy it is to search for photos of Reunion Island by searching for #GoToReunion

#GoToReunion Instagram

Provide free and fast WiFi
This is one of the most important things for any travel writer. You may be in some remote corner of the country, but if they’re on an assignment or job, they need WiFi in order to tweet, post photos on Instagram and stay connected to their audience. If it’s free, they’ll be even more likely to post regularly and share news of their trip with their followers. Also remember that if you’re hosting journalists on trips to countries where they don’t live, they may be relying on WiFi for all their communication to avoid hefty roaming charges. Verify ahead of time that there will be WiFi available at least at some of the restaurants and attractions they’ll be visiting, as well as at the guesthouses and B&Bs. If there’s a fee for WiFi – get it waived.

Give them free time
Travel writers need time to check their emails, write tweets and post photos and also to stop and breathe. If their days are filled with activities they won’t have any time to reflect on their experiences and will find it difficult to promote you. It also doesn’t hurt to give them time to explore and experience things on their own, unaided by biased tour guides with agendas. Find out beforehand what they would prefer.

Give them an itinerary
Providing travel writers with a detailed itinerary ahead of time is essential. Include web links, social media handles (Business social media names, e.g. @open_africa on Instagram or @OpenAfricaOrg on Twitter) and links, contact details, e-mails of people they’ll be meeting and information about places they’ll be visiting. This will give them the opportunity to research ahead of time so they know what they’re writing about during their trip.

Personalise the visit
Travel writers of any kind have different goals and interests in their work (See the difference between traditional journalists and bloggers) By creating an environmentally-friendly trip for a blogger who is an advocate for conservation makes them feel special. These trips aren’t a “one size fits all” experience, and giving the participating journalists or bloggers different options to choose from means you’ll get more value at the end. Make sure that whatever you do, their experience is as authentic as possible. For example, if your route isn’t known for its food and wine, don’t attempt to make a food-themed trip.

Provide a brief
While it may look like they’re permanently on holiday, travelling and telling stories is how these writers earn a living and so each trip should be treated professionally and as a job. If you are paying for the writer to visit your area, provide a brief to them upfront of what you expect in return from them. What are you trying to achieve by hosting them? Is it awareness about the route, or would you like to see an increase in travellers? Do you want to promote an annual festival, or are they coming to your route to experience and cover baby turtles hatching on the beach?

Be clear in terms of social media coverage as well. You can specify how many tweets, Instagram photos and blog posts you want to come out of the trip and this is a helpful guide for them. By detailing this information, the writers will be able to manage your expectations and deliver on a product you can be happy with.

Involve your route members
When planning to visit the journalist or blogger, invite other route members to participate. The costs can be significantly reduced if route members offer free accommodation, activities and meals. In this way you can get great exposure at a limited cost.


The Difference between Traditional Journalists and Bloggers

As the route Marketing Coordinator, you may work with travel writers and bloggers who come to visit the route in order to give it some media exposure. Setting up their trip can be a lot of fun, and creating a diverse and varied itinerary for them while they’re in the area will help the establishments on your route You may be wondering what the difference is between traditional travel journalists and bloggers.

Journalists
Traditional journalists are usually able to adhere to an itinerary and have specific properties or activities that they are looking to cover for an assignment. Also, traditional journalists frequently take notes and follow up for images and more information after their trip when compiling their article. If the journalist works for a specific publication such as Weg/Go or Getaway, be sure to find out ahead of their trip what the specific angle of their story is.

Freelance journalists
Freelance journalists usually enjoy everything that an area has to offer and will do as much as possible in order to provide as many different angles and stories as possible which they can sell to various publications. A freelance journalist can create up to 10 different stories for as many publications from one trip and will sometimes sell different versions of their story to various travel magazines as well as specialist publications, such as mountain biking, hiking or fishing as a few examples.

Travel Bloggers Open Africa Campaign 2014

Travel bloggers involved in a November 2014 campaign for Open Africa.


Bloggers
Bloggers, on the other hand, usually enjoy more free time to explore and discover the quirks of an area. Bloggers are essentially freelance writers who have an impressively large social following. This means that they run their own blogs and have created a personal brand that is big enough for them to be able to make a decent living from it. Sounds great, doesn’t it? Bloggers are usually very active on social media channels, such as Instagram and Twitter, and promote trips or stories through images with a link back to their blog. They also usually tweet or post photos on Instagram throughout their trip to create engagement and interest from their followers (your customers) for a prolonged period, making them a rather valuable marketing tool.

All bloggers have a specific area of interest; some are young and enjoy adventure travel; some are older and focus on environmental issues when travelling; others focus more on the food and people of an area; some are photographers at heart; and some do a little bit of everything! Be sure to target the right kind of blogger to visit your route so that you know they will enjoy the itinerary you have planned.

It is important to bear in mind that while many of the trips bloggers take are sponsored, they still need to put food on the table and require payment in the form of more than a free holiday. Be sure to research them properly and check out the media kit on their website or contact them to find out what their rates are. With enough research, clear communication and a brief, bloggers are very pleasant to work with, so be sure to manage your expectations up front and let them know exactly what you require from them.

Take a look at these popular South African travel bloggers:


7 Reasons Why Having a Facebook Page is Important for Your Business

One of the most important aspects of running a business is marketing and, amongst the tons of seemingly more important things, you might question the need for using Facebook. Many people feel it may be trivial and a waste of time, but take a look at Facebook and you’ll see that all the big brands have a presence there. Why is this? Everyone is on Facebook and is already addicted to it, which means that your customers are already in one place. You just need to speak to them.

Find out how to set up a Facebook page.

Here are some reasons why you should have your presence on a social networking giant like Facebook and take it seriously:

Customer Interaction: Having your business on Facebook through page is a great way to learn more about your customers. Through comments or posts, businesses can have direct feedback and conversations with their target audience. The people who like your business page are only there because they want to be. They are there to know what they can about you and you can do the same thing.

Give a personal touch to your business: Being well connected is important for any business, especially for a small one. Facebook allows you to give your business an image and then you can actually have live conversations with people who matter, making it a more personal experience.

Develop a loyal fan base: Facebook allows you to develop your very own community. All you need to do is post content that is both relevant and useful to your target audience. You can even have promotional campaigns and contests through your page and offer incentives as well. If done correctly, you will find that you can develop a loyal community for your business on Facebook.

SEO: Search Engine Optimization is a key aspect for any business building a presence on the web and having a Facebook page can help you in your SEO efforts as well. All the links and posts on the page are indexed by search engines which makes your business easier to find in search engines.

Beat your competition: One of the biggest reasons for you to make sure that you are on Facebook is that your competition might already be there. In this cut throat environment, lagging behind will make it really hard for your business to succeed.

Viral promotion: If someone ends up liking your page then it appears in their news feed. This makes it possible for your business to be in their eyes on a regular basis through status updates or content posting. What’s more, if they comment on your post, their friends will also see your post and this can help in viral promotion of your business.

Save money: Apart from these facts, Facebook is free. You do not need to spend anything for promoting your company through a Facebook page.

You can read more from the original article on iMarketing Factory.


How to Create a TripAdvisor Account for your Business (with video)

TripAdvisor is the world’s largest travel site, with more than 350-million travellers visiting the site each month to research and plan their trips. If your business is an accommodation, restaurant, or attraction, your property can be listed for free. Being on TripAdvisor will increase your business’ exposure to a large, qualified audience and give you access to many free marketing tools.

Here’s a handy video to help illustrate the guide below:


How to set up an account
There are two ways businesses can set up an account: a representative from your business can request a listing, or a TripAdvisor user can write a review of the property and initiate a listing.

Before you request a listing, go to https://www.tripadvisor.com/Owners to make certain that a traveller hasn’t already added your business to TripAdvisor. Look for the list of categories under the “Start here if you own or manage” header, select your business type and enter your business’ name.

If a match appears in the search box, click “Search” and on the next screen, check that the business name and region matches and then select “Register my business” to confirm that you are affiliated with the business. If your business is already listed, you should register for the existing listing instead of creating a new one. TripAdvisor only allows one listing per business.

Registering allows you to access the Management Centre, where you can manage your TripAdvisor listing and reviews. You can also correct any details that aren’t accurate. Plus, there are free tools to help you build your business. You can find out more information here.

Request a listing
If you enter your business’ name and a match is not found, it isn’t listed on TripAdvisor yet. You can request a listing by selecting the “Tell us more about it” link at the bottom of the search result page. You’ll need to provide a few different types of information about your business to get started. TripAdvisor editors will use this information to confirm that your business meets our listing criteria and determine the best category for it on the site. Complete the request form with as much detail as possible.

Your information
The “Your information” section helps TripAdvisor verify your relationship with the business. Provide your name, connection with the business, and email address. Make sure your email address is correct because they’ll send you a message when your listing is published on TripAdvisor. Then you can register your affiliation with the property to take advantage of free tools.

Listing information for your business
Next, you’ll provide information for your business including your company’s official name and address. Once you’ve typed your address, place the marker on the correct location on the map. Your property’s mapped location will be shown to travellers on the site as they plan their trips. You’ll need to add your company’s website and phone number as well.

Keep in mind that TripAdvisor’s editors use your website or a partner’s website (like a tourist board or reservations partner) to confirm the information you provide. So, it’s important that the data you submit in your listing request matches your website and other resources.

Business details
TripAdvisor will also need you to answer some detailed questions about your type of property. These help them to make sure they’re displaying your business in the right category and including as much relevant information as possible. For more specifics on your particular type of property, check out the categories below:

Accommodations:
As an accommodation owner, your property will be listed on the TripAdvisor hotels section for your destination. There are some specific items you’ll need to provide so they can put you in the correct category within that section:

• Total number of rooms
• Price range
• Minimum stay requirements
• If you have on-site staff and security
• If room cleaning is included
• Front desk staffing details
• If bathrooms are en suite

TripAdvisor uses these characteristics, as well as official, local classifications, to determine if your property should be listed in the Hotels, B&B/Inns, or Specialty Lodging category on TripAdvisor.

You’ll also be able to provide additional information on amenities including whether your property offers complimentary breakfast, suites, tennis/golf, beach/pool access, fitness centre, internet access, etc. These details will be added to the “Amenities” portion of your listing and will help travellers research what they can expect at your accommodation.

Restaurants:
Restaurant listings appear on the Restaurants section of TripAdvisor. Individual restaurants that are open to the public can be listed. You’ll be asked to provide information on your category of restaurant (sit down, café or fast food), type of cuisine, pricing, and any special features. These items will appear on your listing page and will help travellers decide whether or not they’d like to dine at your restaurant.

Attractions:
You’ll need to select a category that best describes your attraction. If your business isn’t a fit for any of the attraction types that are listed, select “Other.” You can also provide your recommended length of visit, pricing information and details on other amenities (bathroom facilities, lockers, etc.).

In order for a property to be listed on TripAdvisor in the Attractions section, it must be a permanent place of interest (not seasonal or short-term) with an official name, address and phone number. The attraction’s hours or regular departure times must be available in a website or brochure, along with scheduled departure locations (if they vary). Tour companies can qualify as an attraction if they offer day tours, are licensed/recognised by the local city or tourism officials and the word “Private” appears in the listing name.

Add a business description
A description of your business helps travellers learn more. It must be written in your local language and cannot include any HTML coding, phone numbers, web/email addresses or text in ALL CAPS. It’s best to keep this description short, so guests can scan the key highlights you’ve provided and make a decision.

Choose a photo
Providing a photo of your business helps you make a strong first impression with travellers. TripAdvisor will display this on your listing page. The photo needs to be a .jpg or .gif (common photo formats). TripAdvisor can’t accept images with borders, logos or files that are larger than 100kb.

Submit the listing
Once you’ve confirmed that all of the information you’ve added is correct, check the box at the bottom of the form to verify that you are a representative of the business, the information you’ve submitted is valid and that you have the rights to post the image you’ve provided. Then click the ‘Submit’ button to complete the process.

Next steps
Once you request your listing, TripAdvisor editors will verify your details and confirm that your property meets the guidelines for the business type you’ve selected. This typically takes about 5 business days.

This guide can be found online on TripAdvisor.


How to Create an Instagram Account (with video)

Instagram is an online mobile (cell phone) photo-sharing, video-sharing and social networking service that enables its users to take pictures and videos, and share them on a variety of social networking platforms, such as Facebook, Twitter, Tumblr and Flickr.

Originally, a distinctive feature was that it confined photos to a square shape, similar to Kodak Instamatic and Polaroid images, but since August 2015, a new version was released, allowing users to post photos captured in any aspect ratio (not just the small square size). Users can also apply digital filters to their images. The maximum duration for Instagram videos is 15 seconds.

Instagram is a mobile app that you can download on iOS and Android phones and tablets as well as Windows Phone 8 and later. You must create your account using the Instagram mobile app, not a computer. After you’ve downloaded the app and created an account, you can then view Instagram from a computer.

Here’s a quick video to illustrate the points below about getting started:

Setting up your account:
1. Download the Instagram app for iOS from the App Store, Android from Google Play Store or Windows Phone from the Windows Phone Store.
2. Once the app is installed, tap the instagram icon icon to open it.
3. Tap Sign Up, then enter your email address and tap ‘Next’ or tap ‘Log In’ with Facebook to sign up with your Facebook account.
4. If you register with email, create a username and password, fill out your profile info and then tap ‘Done’. If you register with Facebook, you’ll be prompted to log into your Facebook account if you’re currently logged out.
Keep in mind, if you sign up with email, make sure you enter your email address correctly and you choose an email address that only you can access. If you log out and forget your password, you’ll need access to your email to get back into your Instagram account.

We advise you find friends either through your Facebook account or your contacts. This way people will know you are on Instagram and will follow your account, creating more awareness. Users can also tag your business when they post photos there which helps you gain more followers, awareness and FREE MARKETING!

To update your profile information, including your username and the email address associated with your account
1. Go to your profile by tapping the icon in the bottom right hand corner instagram profile icon
2. Tap ‘Edit Your Profile
3. Type in your new name, username, website or bio or edit your private information then tap Done (iPhone), Save (Android) or the check mark (Windows Phone)

You are now ready to begin Instagramming your photos!

For more tips on why and how you should be using Instagram to grow your business, check out the two videos below.

Part 1:

Part 2:

This guide can be viewed online on Instagram.


How To Develop A Project Plan For A Short-Term Project (487)

Many of the tasks that your Open Africa route will tackle will be projects – in other words, they will be activities with an aim, a beginning and an end. Short-term projects can last a few days or up to a few weeks, and will usually have only one or two objectives. For instance, it could be a brochure showcasing the route, its members and the surrounding area. Once the Route Forum has discussed the idea and a plan has been approved, it may only take a week or two to put the brochure together.

In this example, the objective is clear: a neatly printed, colourful and informative brochure that will encourage tourists to visit. There may also be another aim: to distribute the brochure to strategic places where potential visitors will pick it up.

To ensure that the project is carried out efficiently (without wasting time, money or resources) and on time, a plan is necessary. This will plot which activity will be done when, and by whom.

This Guide will explain how to prepare a plan for a relatively small project that needs to be completed in a short time. A plan is an important tool to help your route to run more professionally, efficiently and procedurally:

  • It makes you more professional by ensuring that the right people are involved at the right times, to deliver a high-quality result in an orderly way.
  • It makes you more efficient because you can research and decide (in advance) how everything should be done, and you can compare options until you find the best one.
  • Being procedural means acting in accordance with the route’s policies and broad objectives – so that the organisation advances in the right direction and with the blessing and involvement of all members.

The main message of this Guide is that a good plan is the beginning of a good project; if the route fails to plan ahead when it implements its ideas, the result is usually a chaotic and costly activity that undermines the confidence of both the route’s members and its stakeholders.

Alongside this one, also read the Guides on How to Develop A Project Idea, How To Develop A Project Budget, and How To Manage a Short-Term Project.

Why is a project plan important?

A route works differently to a small business. As an owner of a small business, you can make most decisions by yourself and implement them in your own way. The route, on the other hand, needs management and for members to work together in a co-operative style, because the route is made up of members and is there to act in the interest of the members.

This means that more discussion is usually needed so that agreement can be reached on what activities should take place. Part of this discussion is about the planning, because members need to agree on how things are going to get done before they get done. So, a project plan is part of making sure that everyone is happy with an idea and the way it will be implemented.

It is also a good way for the route to mandate a person (or committee) to carry out important tasks in the interest of the route as a collective body. It improves the chances of success and ensures that the route works collectively towards its goals and objectives by co-ordinating everyone’s input and predicting where problems might occur.

What is a project plan, and how do you develop one for a short-term project?

A project plan is a map of how an activity will be implemented, bringing together the skills, money and other resources over a period of time to make it happen in an orderly fashion. Here we want to focus on how to plan for a short-term project – an activity that will take a matter of days up to a few weeks at the most.

Governance

A short-term project will usually consume less money than a medium-term or long-term project, and so will usually need fewer decisions to be made by the Route Forum; the more money is at stake, the more carefully the Forum must check and monitor expenditure and implementation. (For some guidance on turning an idea into an activity, read the Guide entitled How To Develop A Project Idea.)

But even a small project needs to follow a process of being considered and approved by the Route Forum or its designated subcommittee. Before it can make a final decision to allow a project and/or to commit route funds to it, it needs to see a step-by-step plan of how the project will roll out and where the money will be spent.

Timeline

Keeping the project on time will be important, especially if it only runs for a short period. What the project plan needs is a schedule – a timetable that says when each aspect of the activity will take place. So start by breaking up the project into smaller parts and placing them in order on a timeline. Give each task or activity a certain timespan during which it can be completed.

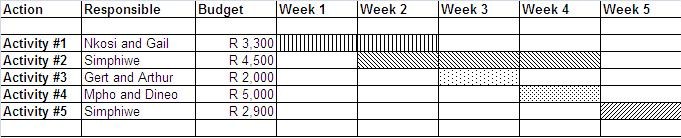
Below is a simple Gantt Chart that shows which activity takes place during which week; this example also shows who is responsible for that activity, and the available budget amount.

Gantt Chart

Budget

Breaking up the tasks also helps the project manager to research the various costs that the project will incur. These costs must be closely estimated by getting quotes from suppliers and service providers in writing so that you can hold them to these costs when the project goes ahead.

Working out the budget in advance is one of the main reasons for doing the plan; it allows the route to see what the project is going to cost before it takes a decision on whether it can go ahead.

People

When setting out the activities in a timeline, you should be able to estimate how many people are needed to get the job done in the time available. Assign a responsible person for each activity. If time is short, then you may need to get more people involved to complete it. This will then also affect the budget.

The plan is now able to help you to:

  • Schedule tasks.
  • Allocate tasks to responsible people.
  • Monitor the project’s progress.

Responsibility and communication

The plan also needs to be clear on lines of responsibility, in other words, who is responsible for making what happen. Each task is usually given to the person or people with the relevant skills, and they are expected to complete the work in the required time and to manage those other people who are helping.

The person who takes overall responsibility is the project manager, who needs to ensure that all aspects of the project are being implemented according to plan. In a small organisation, that project manager will usually also be ‘hands-on’, doing a lot of the actual work themselves.

The project manager must also plan the lines of communication between everyone involved. For instance, everyone involved must know who to give certain information to, such as when a task is completed or when there is a problem, or when more help is required. In a small, short-term project, there may not be the time or need for written progress reports. But the manager needs to be doing much listening and much communicating.

Depending on the type of project, consider meeting (even only briefly) each morning with all involved to assess the previous day’s progress, to find solutions to any problems encountered, and to confirm what is to be done that day. If the team can only meet less often, consider meeting on a Monday morning to plan the week, and on Friday afternoon to assess progress.

Who is involved in project planning?

The Route Forum will need to oversee the planning and authorisation of projects, and may also have to appoint a project manager to take control of the planning and implementation process. The Forum’s Treasurer will usually have to help develop the budget and must then also help control the spending.

The route will also want to make use of the skills and capacity of its members, so there may also be a number of members involved. If possible, the route’s strategic partners will play a role in certain projects; they may contribute funding or they may help with implementation.

How do you apply project planning to the route?

Most of the route’s activities must be planned, and to plan them as a project is good organisational discipline. It gets everyone (the Route Forum, the members and the other stakeholders) into the habit of thinking through ideas and opportunities before rushing into them. And it encourages everyone to implement these ideas carefully and efficiently through a planned process.

Try and plan ahead so that all your route’s projects for the year are incorporated into the annual route plan (read more in the Guide on How To Compile Your Annual Route Plan).

Practical tips

  • Once the project idea has been accepted and the project has been given the go-ahead, have one meeting dedicated to brainstorm the best ways of implementing the project. Build the best strategies into your plan.
  • Keep the project plan as simple as possible so that everyone understands and follows it.
  • When thinking through all the steps (or tasks) in the project, think about what could go wrong. Ask the “what if..?” questions, such as “What if the building materials are delivered late?” Try to build a solution into the plan. Allow some extra time if you can for these sorts of contingencies.
  • Put as much of the plan as possible into a visual format – diagrams and tables (such as the Gantt Chart) – and put these up where everyone can see them. Refer to them in your regular meetings.
  • Adjust and adapt your plan as conditions change – don’t abandon it. Even when you run into problems, you still need deadlines to aim for.

Use of this Guide

This Guide can be used by the Route Forum to help clarify its role when wanting to get projects off the ground. It can also be used by route management, who will often be the ones to plan and implement projects. Members will also find the guide useful, because they need to be involved and they should understand the process.

Other Factsheets and Case Studies

Here are some other factsheets in the Open African Toolkit that can help you with developing and managing projects:


How To Understand Your Natural Strengths (400)

It is the involvement of and contribution from your individual members that allows your route to grow and make a good impact.  It is the route’s ability to organise this involvement and contribution based on the strengths of each of the members that will determine how effective the route becomes and how big an impact it will have.

This Guide is an introduction to the idea that people will flourish if they concentrate on doing the things they are naturally good at and that they enjoy doing. If it is possible for a route member to do what he or she is best at, and this is combined with others who are doing what they are best at, the route is bound to become a strong team. In fact, thinking of the route as a sports team is a good analogy – each member should ‘play’ the ‘position’ he or she is most suited for…

How to understand your strengths

There are many ways to use your strengths to achieve better results. For instance, you may have realised over time that you find some things much easier to do than others, or you may have noticed that what comes naturally to you, others find difficult to do.

The reason for this is that you embody a unique combination of characteristics, some based on your experience, skills and knowledge you built up over time, and others by the things that you are just naturally good at.

The way that many of us are raised is based on trying to make up for the things we are not good at. For instance, we are told to study extra-hard at the school subjects we are not so good at; we are not encouraged to forget about those we are bad at, so that we can really get ahead with the ones we are good at. In our professional environments, we tend to do the same: we work hard at the things we know that must get done but which we do not enjoy, and then there is little time left to do what we really love doing!

In developing ourselves based on what we are already naturally good at, we are likely to achieve better results. But how do we know what it is that we should focus on, or how do we determine what it is that our natural strengths direct us towards?

Strengths test tools

One way is to use “strength-finder tools” to provide feedback on what we are naturally good at and what it is that we are inclined to enjoy more.

Here are some of the commonly used tools:

Each of these systems have their own advantages and disadvantages as tools to help you find your best game. However, the underlying understanding of energies found in another system – called the Five Energy Dynamics – is also the foundations of some of the other tools used in the Open Africa Route Toolkit. It is therefore recommended that the Five Energy Dynamic tool is used as a starting point in your exploration of finding your best game.

In addition to Five Energy Dynamics, the above-mentioned tools may well help you to add more dimensions of understanding, but the reports provided to users who complete the Five Energy Dynamics Questionnaire will find reference to the five energies elsewhere in the toolkit much easier to understand if they start out by doing this short test. For instance, the one-page planning tool covered in the How To Compile A One-Page Plan also uses the five energies as a primary reference point.

You can get free access to the Five Energy Dynamics Questionnaire here: www.flowfinders.com/energy

What is the Five Energy Dynamics?

The Five Energy Dynamics is based on ancient Chinese Energetics. It is a personal development framework that helps you to understand who you are and how you relate to others.

In measuring your individual balance of the five different energies used by the ancient Chinese civilisations more than 5 000 years ago, the Five Energy Dynamics offers you insights into both those aspects you can excel at and those you are likely to find challenging.

How to get an Energy Dynamics report

When you complete a Five Energy Dynamics Questionnaire, you also receive a report on your dominant energies and how you can apply these insights in your business life. It will also give you pointers you can apply to your involvement in the Open Africa routes.

You can get free access to a detailed report on your dominant energies when you complete the www.flowfinders.com/energy questionnaire.

Other Factsheets

You may also want to have a look at the following Guides and Examples covering related topics:

Other Resources


How To Use The Open Africa Route Toolkit (213)

The Open Africa Route Toolkit is a valuable resource for routes to increase their impacts.

It offers route members advice on various aspects of the good functioning of their routes (through Guides), it tells the stories of other routes (through the published Examples). It also presents various Resources that routes will find of use, such as forms needed for the routes, templates of documents the route can adjust to meet its requirements, and links to video clips on various topics of importance to the routes.

Understanding the Route Toolkit’s structure

The Route Toolkit consists of various interlinked Resources. The best way to explain the Route Toolkit would be to say that it is a cobweb of linked pieces of information, organised into various units.

Each Resource covers two to five pages, on average. The aim is to offer you a concise explanation, with links to other Resources and external resources such as books, other websites, or content that will be useful.

You can read one Resource on its own and it will make complete sense, since it is presented as a stand-alone unit.

Four kinds of Resources

Resources fall into four categories:

  • Guides
  • Factsheets
  • Examples
  • Resources.

Guides

Guides offer you advice on a range of topics and issues relating to the good functioning of your route. Guides usually start with the words ‘How To’, since their function is to explain exactly how to get something done or how to achieve a specific desirable outcome.

While Guides are stand-alone Resources that you can read and understand on its own, they form part of the bigger framework of Resources. In the Guides, you will find reference to other Guides, as well as Examples that illustrate advice. in the Resources, you may find useful to get to know more about the topic. All of these are connected through active hyperlinks, allowing you to open these Resources with a simple click.

Factsheets

[Insert text here]

Examples

Examples include case studies of Open Africa routes. They tell the stories of what other routes have done to achieve good results. Examples also include short anecdotes or reflections on events or activities.

As a result, Examples are presented in various formats, depending on how the story can best be told.

Resources

Resources offer additional content to help route members in exploring more detailed information or material to use in route educational activities.

It also gives route members access to Open Africa documentation, standard forms that routes may need, templates of documents a route may use to compile its own documents, and video material on a range of topics.

Who may use the Route Toolkit

The Open Africa Route Toolkit is available for use by all active members, as long as they comply to the membership requirements of an accredited Open Africa route. However, when members serve on the Route Forum, they are likely to need more detailed information to fulfil their duties. As a result, Route Forum members are more active users of the Toolkit. But all the content is available to all members.

How to get access to the Route Toolkit

The Route Toolkit is an online resource, available through any device with an internet connection and web browser. Follow the sign-up procedures specified in the Guide How To Sign Up For The Open Africa Route Toolkit.

How to help in improving the Route Toolkit

The intention with the Route Toolkit is to offer useful information to route members and those serving on Route Forums. Members who are active in routes are the most suitable to identify what information is needed, because it is the information that they seek to use that should be available through the Route Toolkit.

Members are encouraged to suggest new Resources, Factsheets, Examples and/or Guides, or to propose edits or additions to existing ones. For more on this, see the Guide How To Propose Additional Content Or Edits To The Toolkit.

Other Guides you may want to look up


How To Attend Travel Shows (148)

Exhibiting at trade show and events provides useful opportunities for your route to showcase products and expertise, network with potential customers and suppliers and keep up to date with news and developments.

There are numerous travel shows both in South Africa and abroad that is worthwhile attending. The most popular among the South African shows is the Getaway Show, which is held in Cape Town and Johannesburg. Open Africa attends the Getaway Show from time to time and all the routes in the network are invited to participate. Routes will need to pay for the cost of the stand, furniture rental and marketing material that will be distributed at the show and it is up to the route to raise the necessary funds for accommodation and travel to and from Cape Town or Johannesburg.

This Guide will help you prepare for an event by completing the right administration, planning your stand and preparing your employees. It also includes hints and tips and sources of further information.

While travel shows are useful events to market your route and its members, they can be expensive to attend and often hundreds of other businesses and competitors take stands. So it is vital to prepare well so that everyone involved in your delegation and the members along your route can get the most out of an exhibition. The fundamental aim of a route attending a trade show is to stand out and to attract potential customers.

There are also Guides on marketing route (using various media), a Guide on How to Develop a Marketing Plan, and a Marketing Toolkit by Open Africa.

Why are travel shows important?

Travel shows usually are open to the public, so they bring us face to face with potential customers. These people are at the show because of their interest as tourists, so they are a good group to target as they are more likely to buy what we have to offer.

The shows are also important as a networking opportunity among other tourism providers, many of whom have services that could feed into our route. For instance, tour operators may not know much about your area – this is your opportunity to sell your route to them and bring in bus-loads of tourists.

How can the route make best use of travel shows?

A travel show is an exhibition of products and services in the tourism sector, usually open to the public – where exhibitors promote themselves to visitors and network with others in their sector. The events are usually organised by professional events management companies but smaller shows are sometimes arranged by trade associations or government agencies to promote a particular areas or sectors.

Deciding where to exhibit

Not every trade show, exhibition or convention is worth the time, effort and/or money it takes to organise a successful stand. In order to find suitable events to get involved with you will need to:

  • Identify exhibitions that are relevant to your business. Trade associations sometimes publicise key events and exhibitions relating to tourism. Ask other businesses that have exhibited previously whether they found it a cost-effective event.
  • Find out who visits the exhibitions you are interested in. You want as many potential customers as possible to see your products and services so check the exhibition has an established reputation. Ask the exhibition organisers to send you visitor figures and profiles for the past few years.
  • Find out if the exhibition is open to the public or the trade only.
  • Research the visitor profile to identify whether the demographics fit with your target audience.

Once you’ve identified a show to exhibit at, the next step is to check the costs and practicalities of exhibiting. Before booking space or registering with an exhibition organiser consider the following:

  • Facilities – establish exactly what is included in an exhibitor’s contract price. Hiring exhibition space is usually divided into two categories: ‘space only’ means that you are expected to provide all your own structural equipment, including a stand, screens, furniture and lighting. By contrast, a ‘shell scheme’ provides basic structural panels, but you will still need to provide your own livery, literature and any other promotional materials, electricity supply, lighting and furniture.
  • Costs – set a budget for the event. Check out not only the obvious costs but also the hidden charges that will arise for electricity and use of facilities. A standard carpet is usually included in the stand price but there will be an additional cost if you want cupboards, chairs and tables, or spotlight and electricity sockets.
  • Extra facilities – ask if demonstration space or private meeting rooms are available at the venue.
  • Location and access – check that the venue can be accessed easily by all your potential customers and visitors.
  • Labour requirements – establish who is allowed to carry out work on your stand if you have booked space only and book subcontractors’ time well in advance. Some venues and exhibition organisers insist the construction of stands and the installation of facilities are carried out by the venue’s own contractors.
  • Opportunities for workshops and seminars – these are a useful way to create awareness of your business and its products and/or services and can drive visitors to your stand. Remember, don’t use them as a sales pitch, more as an educational tool.

Preparing for an exhibition

Once you have decided on a suitable exhibition, you should appoint a member of the route forum to be responsible for organising the exhibition or, if you have hired a specialists, liaise with them. Whoever you decide should be responsible will need to deal with the following issues:

  • Venue – if attendance at a particular exhibition is crucial to you, book well in advance to ensure the best choice of stand and make sure deposits and hire charges are paid promptly. You may be able to get a discount if you book at the last minute, are exhibiting for the first time or book more than one exhibition with the organiser (if they are part of a series).
  • Accommodation – some exhibitions last several days, so participants will need hotel accommodation if the event is some distance away from your route. Book this early to avoid last-minute problems, especially with large exhibitions. Many exhibition organisers negotiate special rates with local hotels.
  • Transport – you will need suitable vehicles or a courier service to transport your exhibition material and equipment including computers and leaflet stands. Remember that posters, literature, models and samples can take up more space than you think.
  • Insurance – check that your business adequate insurance has been taken out for the exhibition. You should pay particular attention to the Public Liability insurance. Some venues require you to have a minimum level of insurance cover in place so you should check this in advance.
  • Site and stand – whether you have booked a shell scheme stand or arranged for the construction of your own stand, you should attend the venue at the earliest opportunity to check that everything is satisfactory. Even with a shell scheme stand you will usually have to hire and pay separately for furniture and electrical equipment and supply.
  • When you arrive at the venue check carefully that all screens, shelving, desks, seating, display aids and lighting are in place and that all electrical sockets are working properly. If participants are expected to erect a stand themselves, they will need to be shown how to do it prior to the event.
  • Storage – check that there is adequate storage for personal belongings, literature, refreshments and anything else you plan to take along. You should also consider having some lockable storage space to keep valuable items secure.
  • Badges and permits – you need to book, collect and distribute all your exhibitors’ entry permits for participants and guests. Check that each member of the team has a personal badge that clearly shows their full name, job title and the name of your route.
  • Presentation – make sure the stand and your staff always look neat, tidy and professional. Ensure that any corporate clothing and uniforms have been organised or a dress code agreed.
  • Computer equipment and screens (if appropriate) – check that you have all the printers, laptops and screens that you will need or arrange to hire them. Ensure that your staff know how to operate the equipment and that it works properly.
  • Parking – check that sufficient parking permits for you and your staff have been issued and that arrangements have been made to allow extra deliveries where necessary.
  • Extra space – if you need meeting rooms or demonstration areas, check that they have been reserved and are not double booked.
  • Participants– choose enthusiastic members of the route who are natural communicators. Don’t forget to draw up staffing rotas to ensure you have enough people to allow for proper meal breaks, rest periods and attendance at relevant seminars. Your stand should never be left unattended, even for a few minutes, while the exhibition is open.
  • Training – ensure that your team is fully briefed and clear about your aims before the exhibition begins. They will need a thorough knowledge of any products and services you are promoting at the event.
  • Literature – check that you have all the stationery, brochures, business cards, order forms, leaflets, corporate gifts and giveaways you need. Take plenty of spare stationery and paper as you often need more than you think.
  • Deadlines – the exhibition organiser will usually provide you with an exhibitor’s pack. This may be a manual or details of a web portal you can access. It will include a list of key deadlines (for example, when payments need to be made, when bookings must be confirmed and deadlines for submitting forms).
  • Marketing – send out invitations to the exhibition to your potential and existing customers and suppliers, the media, corporate guests and other VIPs. Promote your attendance at the exhibition on your website, in newsletters, e-mails, social media and promotional literature. Find out who else is exhibiting as they may be potential partners or customers. Contact them beforehand to arrange meetings at the exhibition.
  • Finally, and most importantly, ensure that you have proper systems to record the contact details of all new customers who are interested in your route. At the very least, each member of your team should be issued with a notebook and plenty of pamphlets.

What should you do immediately before an exhibition?

Draw up a checklist including everything that you need to take with you to the event and all the details you need to arrange, together with contact names and numbers of all suppliers. Remember to include items to cover all contingencies, including first aid and refreshments for participants, and take plenty of back-up supplies and equipment.

Draft a contingency plan to adopt if anything should go wrong and ensure that the venue can provide bureau services if you need them.

Ensure that you have set goals and targets by which you can measure the effectiveness of the exhibition afterwards.

Consider informing your local press and obtaining PR coverage of your attendance at the event.

It is vital that every member of the team is properly briefed before they take part in an exhibition. A week before the event you should give all participants a briefing pack to ensure that they fully understand the following:

  • Product and services.
  • Prices.
  • Sales techniques to be used or avoided. If necessary, organise role-playing sessions to ensure everyone is fully familiar with your expected standards of behaviour.
  • Rotas, including meal times and rest breaks. Make sure the participants are clear about how much time they need to set up and close down.
  • Dress code.
  • Contact numbers for the whole team and emergency numbers for the exhibition organiser and venue manager.
  • Enquiry handling – make sure that team members know who to consult if faced with an enquiry they feel unable to answer.
  • Accommodation and transport – staff should know exactly where they are staying and how they are expected to travel to the venue.
  • Targets and objectives – make it clear to your staff what you expect of them and what outcome you expect from the exhibition.

What do you need to do during the exhibition?

It is critical to ensure that you maximise visitor numbers to your stand and capture contact information from potential clients so that you can follow them up afterwards with a view to converting enquiries into sales.

The most important thing to monitor throughout the exhibition is the appearance of your stand. You or your exhibition co-ordinator should regularly restock empty brochure displays, tidy shelves and cabinets and clear away rubbish.

During the exhibition you should visit other stands to network with exhibitors, find out what they are doing and what they are offering to customers. This also provides an opportunity to build partnerships and find customers and suppliers for your route (or your members along your route).

After the exhibition you will want to evaluate your business’ performance and balance the achievement of objectives against the cost of attendance. Therefore during the event you should record the following:

  • Number of visitors and enquiries taken.
  • Number of samples and leaflets taken.
  • Number of hits on your website.
  • Positive comments.
  • Negative comments, including complaints and criticisms.
  • Any issues raised by visitors.
  • Details of any press or media interest.

Who is involved with trade shows?

The Route Forum can research the available travel shows that members would find useful, and discuss these options with members before a decision is made on which ones to attend. They can also use the links with Open Africa to explore which shows have been most useful in the past, and perhaps even where there might be funding to cover some of the costs of attending certain shows.

Trade associations (or chambers of commerce) in the route’s nearest towns – as well as the local and district municipalities – may also be involved in trade shows. They may be organising their own shows or may be instrumental in getting delegations from their area to attend a show elsewhere. The route and its members could take advantage of these links by talking to chambers and municipalities before making your own plans.

How could the route deal with trade shows?

In the experience of Open Africa, the best way to make use of travel shows is for the route itself to take the exhibition space on behalf of members – and then all members can be promoted at the show. This does not necessarily mean that all members must attend – many do not have the time or resources. Those who can exhibit on the stand must do so, and those members who can’t be there can send their brochures and other promotional material.

It might be necessary to set up a small committee of members to assist with all the planning for such an event – including the preparation of marketing material like banners, brochures, business cards, price lists, etc if these do not already exist.

Practical tips

  • If you are unsure whether to exhibit at a particular exhibition or venue, you could visit your chosen exhibition first before committing to booking a stand at the next one.
  • Try to choose the best position for your stand that your budget will allow. A central position in the exhibition hall, corner sites and sites at the ends of walkways are best.
  • Printing can be expensive, so have detailed brochures available for serious enquirers and leaflets for casual visitors.
  • Don’t let people linger around the walkways outside your stand – invite them in!
  • Consider hiring a professional photographer because you can use pictures of your stand in future sales literature.
  • Remember that exhibitions are news – don’t be afraid to contact local or trade press.
  • Don’t forget to follow up all leads with a telephone call, e-mail or letter after the exhibition has closed.
  • Take advantage of the fact that some exhibition organisers provide lists of visitors after the show for direct marketing purposes.
  • Analyse and review the effectiveness of your attendance at the exhibition in terms of leads generated, sales achieved and objectives met, quantified against costs and investment of time.
  • Check with the organiser whether there are special requirements for playing music or serving alcohol on your stand.

Use of this Guide

The route functionaries can use this guide to help research, select and plan the next travel show where you want to exhibit; it can also be used to brief members on what is involved in getting ready for such an event. It is the members who must mainly man the exhibition stand, so they all need to know what is expected.

Someone from the route who is good at exhibitions could also use this guide as part of a training session for members before going to a travel show; the training can be quite informal and only needs to take a couple of hours.

Other Factsheets

There are other factsheets available on the topic of marketing your route. These include:

Contacts

The Exhibition Association of South Africa has a list of upcoming exhibitions at: http://www.exsa.co.za/events

There are also a range of provincial tourism portals that advertise trade shows:


How To Set Up A Facebook Page for your Business/ Route (with video)

Want to know why it’s important your business has a Facebook page? Read 7 Reasons Why Having a Facebook Page is Important for Your Business.

How to set up a Facebook page:

  1. Go to www.facebook.com/pages/create
  2. Click to choose a Page category.
  3. Select a more specific category from the dropdown menu and fill out the required information.
  4. Click ‘Get Started’ and follow the on-screen instructions.

Here’s a quick and easy video tutorial to illustrate the above steps:

https://www.youtube.com/watch?v=n4N0yyB6hE8